Using Outlook Web Access (OWA)
- Configuring Junk E-Mail Filters in Outlook Web Access (OWA) Guidelines https://web.archive.org/web/20191030212812/http://helpdesk.dlsu.edu.ph/guides/owa/#configure
- How to view your Blocked Senders List in OWA https://web.archive.org/web/20191030212812/http://helpdesk.dlsu.edu.ph/guides/owa/#block
- How to view your Safe Senders List in OWA https://web.archive.org/web/20191030212812/http://helpdesk.dlsu.edu.ph/guides/owa/#safe
- How to mark an e-mail as SPAM https://web.archive.org/web/20191030212812/http://helpdesk.dlsu.edu.ph/guides/owa/#spam
- How to mark an e-mail as NOT Spam https://web.archive.org/web/20191030212812/http://helpdesk.dlsu.edu.ph/guides/owa/#unmark
- How to add an e-mail address to your Safe Senders List https://web.archive.org/web/20191030212812/http://helpdesk.dlsu.edu.ph/guides/owa/#add
Configuring Junk E-Mail Filters in Outlook Web Access (OWA) Guidelines
Mail classified by the server as Junk E-mail will be delivered to your Junk E-Mail folder. Deleting junk emails may save a lot of space in your E-mail so you don’t easily go over your mailbox quota. You can also enable your e-mail’s Spam Filtering to automatically get rid of Junk E-mails. To enable this option, follow these steps:
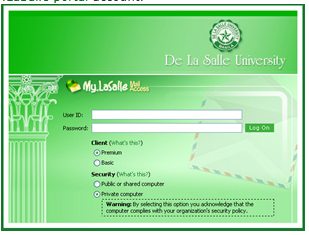
- Login to your LaSalle portal account.
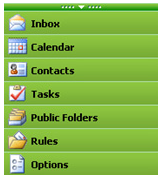
- On the left side of your MLS e-mail account window, near the bottom, is a set of buttons. Click Options.
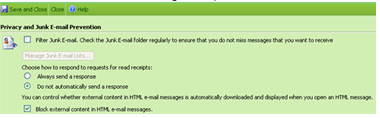
- In the Options window, scroll down the section titled Privacy and Junk E-mail Prevention. This is where you setup your Junk E-mail settings in Outlook Web Access. To enable the Junk E-mail filter, tick the Filter Junk E-mail check box. It is also suggested that you tick the Block external content in HTML e-mail messages check box as this can help protect your computer from viruses as well as SPAM trackers sent in E-mail messages to you.
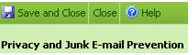
Click the Save and Close button to save your settings and return to your Inbox. Your new settings will now be activated.
How to view your Blocked Senders List in OWA
The Blocked Senders List enables you to view and manage e-mail addresses of known and unknown spammers. Messages from e-mail addresses on this list are treated as spam by the Junk E-mail Filter and are moved to the Junk E-mail folder instead of the Inbox.
- Open your OWA email account.
- On the lower-left pane, click Options.
- On the right-pane, scroll down until you see the Privacy and Junk E-mail Prevention.
- Click Manage Junk E-mail Lists.
- In View or Modify list select Blocked Senders.
How to view your Safe Senders List in OWA
The Safe Senders List enables you to view and manage e-mail addresses of known e-mail senders. E-mail addresses on this list will never be treated as spam by the Junk E-mail Filter.
- Open your OWA email account.
- On the lower-left pane, click Options.
- On the right-pane, scroll down until you see the Privacy and Junk E-mail Prevention.
- Click Manage Junk E-mail Lists.
- In View or Modify list select Safe Senders.
How to mark an e-mail as SPAM
When the Junk E-mail Filter fails to detect an email as spam, you can manually tag that email address and have the Junk E-mail Filter detect it as spam in the future.
- Open your OWA email account.
- On your Inbox folder, right-click the spam email then select Add Sender to Blocked Senders List.
How to mark an e-mail as NOT Spam
When the Junk E-mail Filter incorrectly detects an email as spam, you can manually un-tag that email address so that the Junk E-mail Filter will not deliver that email to the Junk E-mail folder in the future.
- Open your OWA email account.
- On your Inbox folder, right-click the spam email then select Add Sender to Safe Senders List.
How to add an e-mail address to your Safe Senders List
If want to make sure that an email will go to your Inbox and not to the Junk E-mail folder, add the sender’s email address to the Safe Senders List by following these steps:
- Open your OWA email account.
- On the lower-left pane, click Options.
- On the right-pane, scroll down until you see the Privacy and Junk E-mail Prevention
- Click Filter Junk E-mail.
- Click Manage Junk E-mail Lists.
- In the View or Modify list, select Safe Senders then click Add.
- Type the email address you want to be considered as Safe Sender then click OK.
- You should see the email address listed as Safe Sender. Click OK.
- Click Save and Close.